Kubernetes Must Know Tools
After 8 years of working with Kubernetes across different teams and environments, I’ve learned that having the right tools makes the difference between struggling with Kubernetes and thriving with it. This isn’t just another “awesome-kubernetes” list - these are the tools I actually use, ranked by how often you’ll need them.
Essential Tools Ranked by Daily Usage
| Rank | Tool | Category | How Often You’ll Use It | What It Does | Free/Paid |
|---|---|---|---|---|---|
| 🥇 | kubectl | CLI | Every single day | Official K8s command-line tool | Free |
| 🥈 | K9s | TUI | Daily | Terminal UI for cluster management | Free |
| 🥉 | Helm | Package Manager | 3-4 times per week | Package manager for K8s applications | Free |
| 4️⃣ | Lens | IDE | 2-3 times per week | Visual IDE for K8s cluster management | Free/Pro |
| 5️⃣ | Kustomize | Config Management | Weekly | Template-free config customization | Free |
| 6️⃣ | Skaffold | Development | When developing | Local development and deployment | Free |
| 7️⃣ | Flux | GitOps | Once set up, runs constantly | Continuous delivery with GitOps | Free |
| 8️⃣ | Argo CD | GitOps | Alternative to Flux | Declarative GitOps CD for K8s | Free |
| 9️⃣ | Istio | Service Mesh | Complex deployments only | Service mesh for microservices | Free |
| 🔟 | Timoni | Package Manager | Alternative to Helm | CUE-based package manager | Free |
The Daily Drivers (You’ll Use These Every Day)
1. kubectl - Your Primary Interface
# The bread and butter commands you'll use constantly
kubectl get pods
kubectl describe pod <pod-name>
kubectl logs <pod-name> -f
kubectl exec -it <pod-name> -- /bin/bash
kubectl apply -f manifest.yaml
kubectl delete -f manifest.yaml
# The bread and butter commands you'll use constantly
kubectl get pods
kubectl describe pod <pod-name>
kubectl logs <pod-name> -f
kubectl exec -it <pod-name> -- /bin/bash
kubectl apply -f manifest.yaml
kubectl delete -f manifest.yamlWhy it’s #1: You literally cannot work with Kubernetes without kubectl. It’s the official CLI and your primary interface to any cluster.
Pro tip: Set up aliases to save your sanity:
alias k=kubectl
alias kg='kubectl get'
alias kd='kubectl describe'
alias kl='kubectl logs'
alias k=kubectl
alias kg='kubectl get'
alias kd='kubectl describe'
alias kl='kubectl logs'2. K9s - Terminal UI That Actually Works
K9s transforms your terminal into a powerful Kubernetes dashboard. Here’s what makes it indispensable:
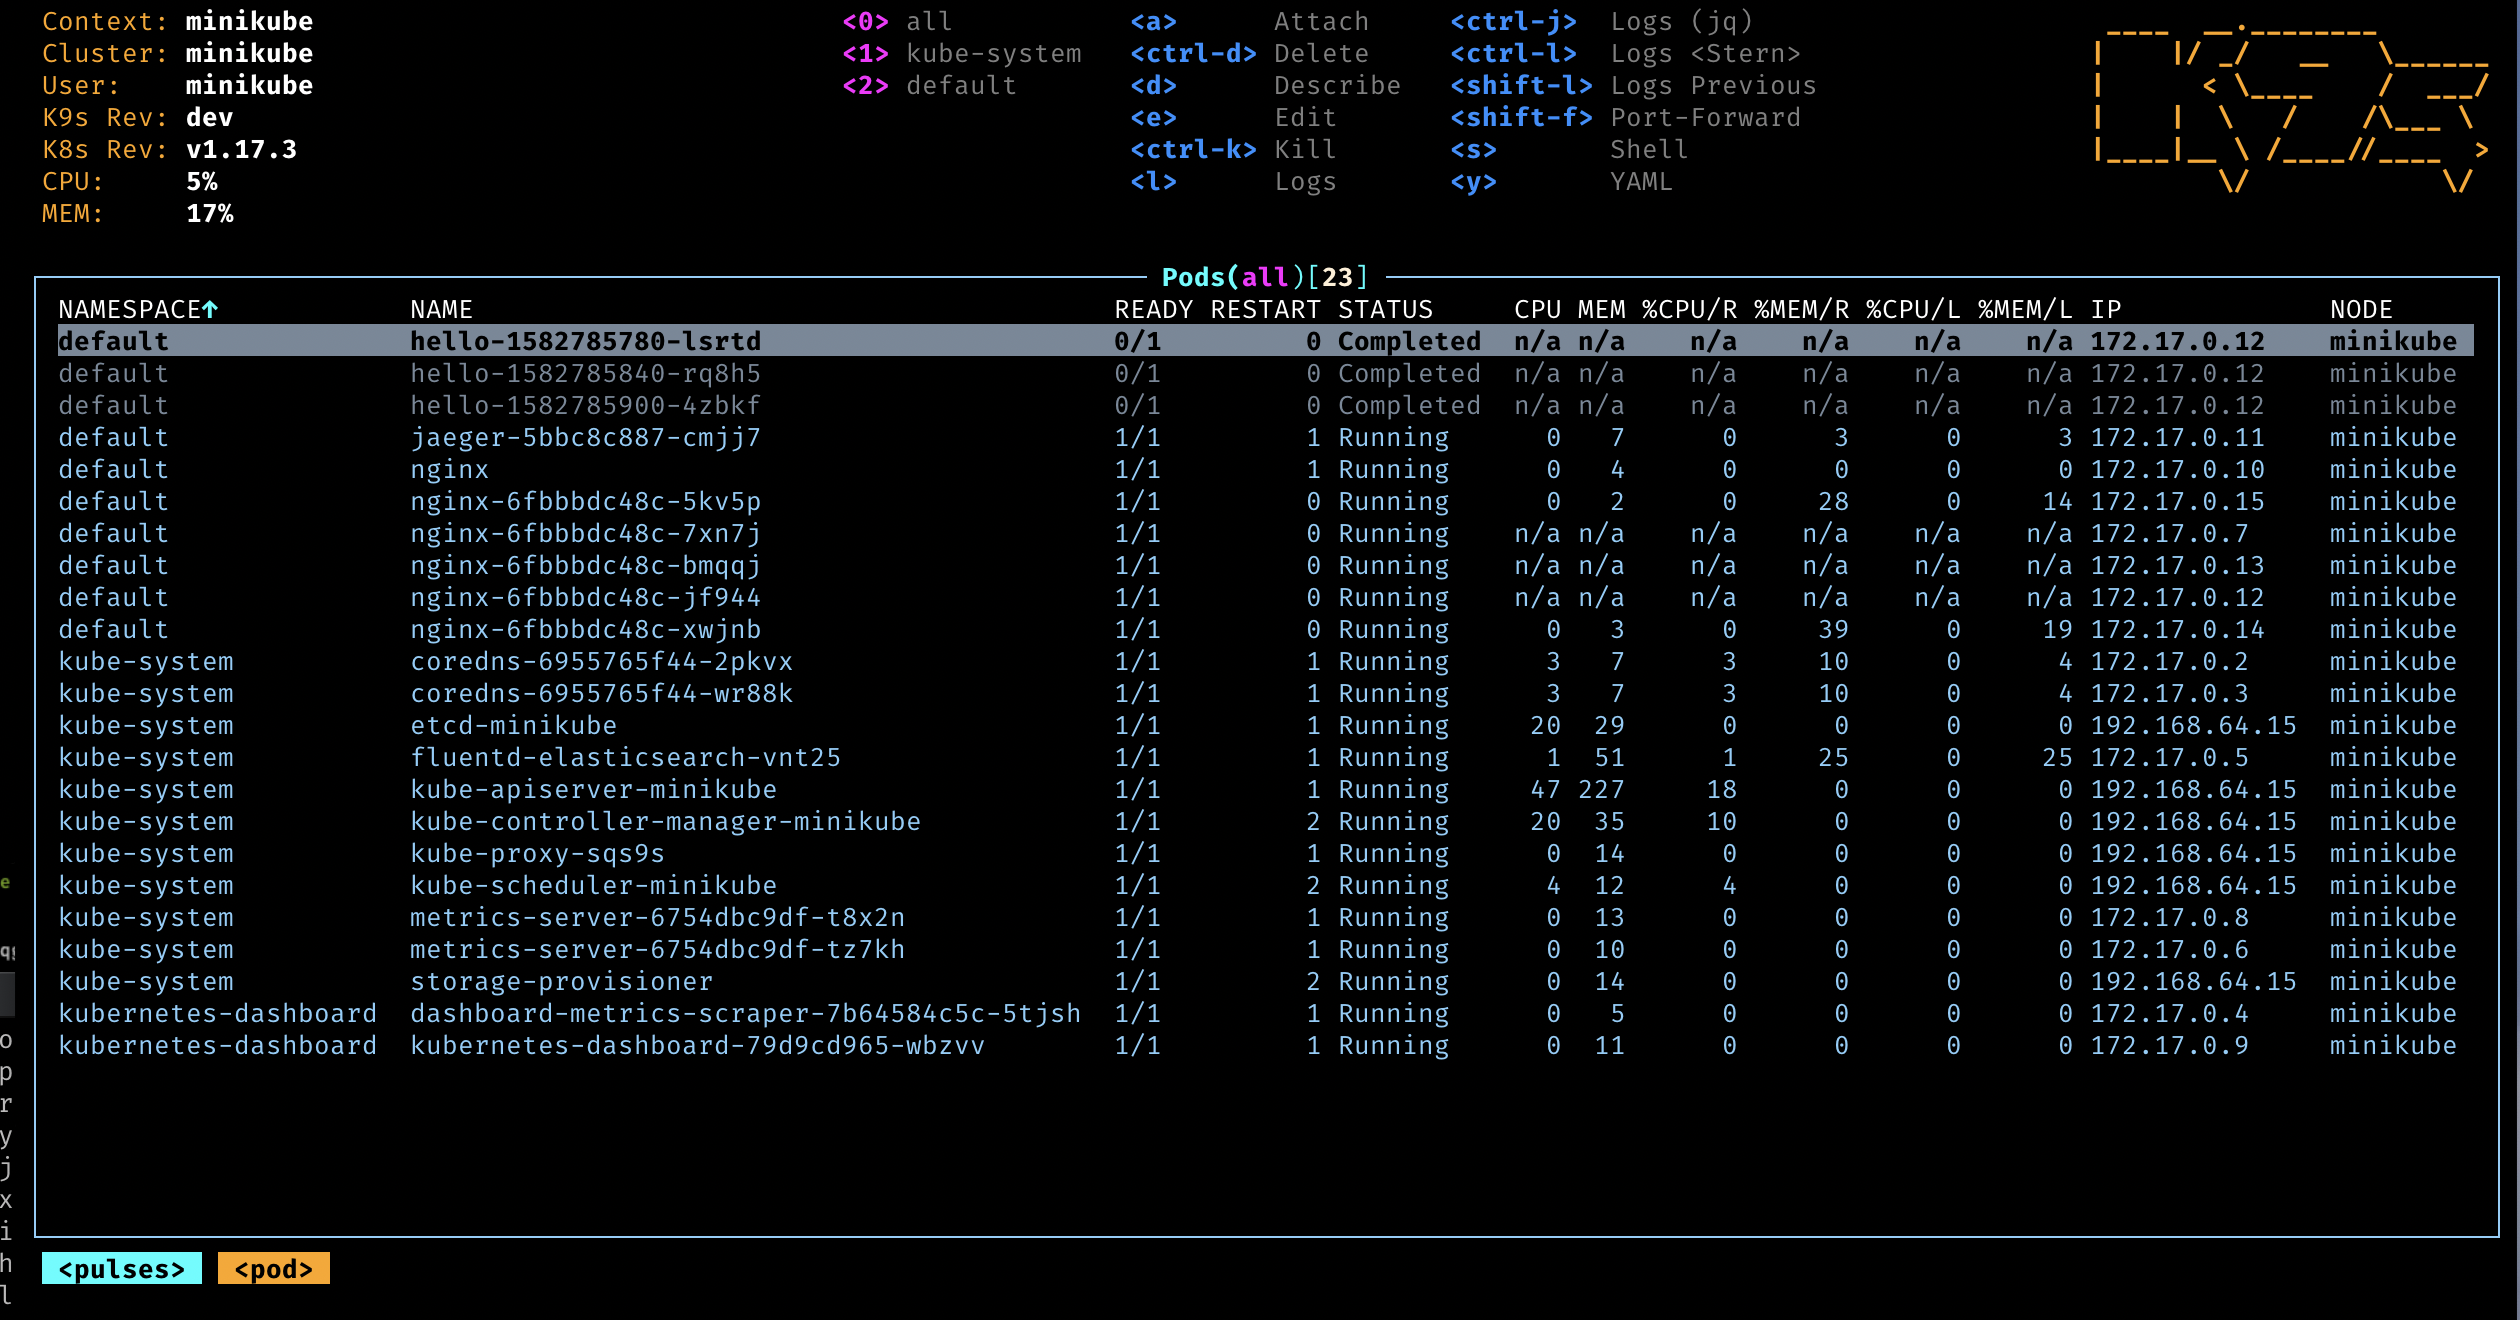
Key Features:
- Real-time cluster monitoring
- Navigate resources with vim-like keybindings
- Stream logs from multiple pods
- Execute into pods directly
- Resource usage metrics
- Context switching between clusters
Daily use cases:
- Check pod status across namespaces
- Quickly jump to logs when something breaks
- Monitor resource usage
- Debug networking issues
Why it beats the alternatives: Unlike Lens, it’s terminal-based so it works in any SSH session. Unlike kubectl, it gives you a visual overview of your cluster state.
The Heavy Lifters (Multiple Times Per Week)
3. Helm - The Package Manager Everyone Loves to Hate
Despite its reputation for complexity, Helm is essential for managing applications at scale:
# Install applications with one command
helm install my-app bitnami/nginx

# Upgrade with custom values
helm upgrade my-app bitnami/nginx -f custom-values.yaml

# Template and inspect before deploying
helm template my-app bitnami/nginx --values custom-values.yaml
# Install applications with one command
helm install my-app bitnami/nginx
# Upgrade with custom values
helm upgrade my-app bitnami/nginx -f custom-values.yaml
# Template and inspect before deploying
helm template my-app bitnami/nginx --values custom-values.yamlReal-world example: Installing monitoring stack:
# Add the Prometheus community Helm repo
helm repo add prometheus-community https://prometheus-community.github.io/helm-charts

# Install Prometheus and Grafana with one command
helm install monitoring prometheus-community/kube-prometheus-stack
# Add the Prometheus community Helm repo
helm repo add prometheus-community https://prometheus-community.github.io/helm-charts
# Install Prometheus and Grafana with one command
helm install monitoring prometheus-community/kube-prometheus-stackWhy it’s essential: Try installing Prometheus without Helm. You’ll be managing 20+ YAML files with hundreds of configuration options. Helm reduces this to a single command with customizable values.
4. Lens - The IDE When You Need Visual Clarity
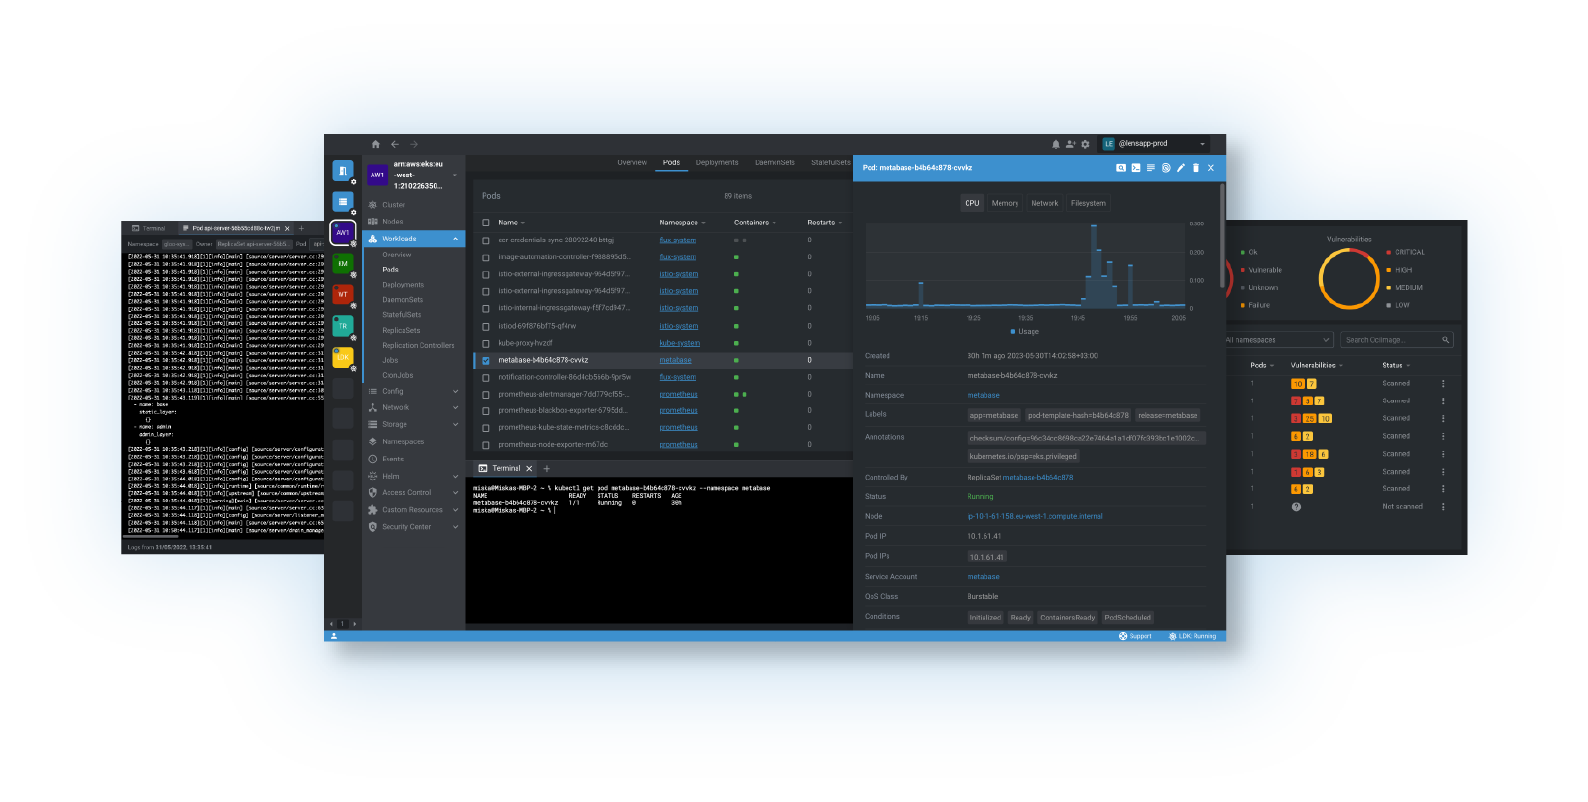
Lens shines when you need to:
- Visualize complex deployments
- Edit YAML files with validation
- Compare resources across clusters
- Onboard new team members (great GUI for learning)
When to use Lens over K9s:
- Visual learners on your team
- Complex debugging requiring multiple views
- Editing large YAML manifests
- Presenting cluster state to stakeholders
The Specialists (When You Need Them, You REALLY Need Them)
5. Kustomize - Configuration Without Templates
Built into kubectl, Kustomize lets you customize configurations without templating:
# kustomization.yaml
resources:
  - deployment.yaml
  - service.yaml

patchesStrategicMerge:
  - replica-count.yaml

images:
  - name: nginx
    newTag: 1.21.0
# kustomization.yaml
resources:
- deployment.yaml
- service.yaml
patchesStrategicMerge:
- replica-count.yaml
images:
- name: nginx
newTag: 1.21.0Apply with:
kubectl apply -k .kubectl apply -k .Why choose Kustomize over Helm:
- No templating language to learn
- Built into kubectl
- Easier to understand for simple use cases
- Better for environment-specific configurations
6. Skaffold - Development Loop Automation
Skaffold automates the development workflow:
# skaffold.yaml
apiVersion: skaffold/v4beta1
kind: Config
build:
  artifacts:
    - image: my-app
deploy:
  kubectl:
    manifests:
      - k8s/deployment.yaml
# skaffold.yaml
apiVersion: skaffold/v4beta1
kind: Config
build:
artifacts:
- image: my-app
deploy:
kubectl:
manifests:
- k8s/deployment.yamlDevelopment workflow:
# Continuous development
skaffold dev

# Build and deploy once
skaffold run

# Debug mode
skaffold debug
# Continuous development
skaffold dev
# Build and deploy once
skaffold run
# Debug mode
skaffold debugGame changer for development: Instead of manually building, tagging, pushing, and deploying every code change, Skaffold watches your files and automates the entire pipeline.
The Production Operators (Set Once, Run Forever)
7. Flux vs 8. Argo CD - GitOps Delivery
Both tools implement GitOps - the practice of using Git as the source of truth for your cluster state.
Flux approach:
# GitRepository
apiVersion: source.toolkit.fluxcd.io/v1beta1
kind: GitRepository
metadata:
  name: my-app
spec:
  url: https://github.com/my-org/my-app
  interval: 1m
# GitRepository
apiVersion: source.toolkit.fluxcd.io/v1beta1
kind: GitRepository
metadata:
name: my-app
spec:
url: https://github.com/my-org/my-app
interval: 1mArgo CD approach:
# Application
apiVersion: argoproj.io/v1alpha1
kind: Application
metadata:
  name: my-app
spec:
  source:
    repoURL: https://github.com/my-org/my-app
    path: k8s/
# Application
apiVersion: argoproj.io/v1alpha1
kind: Application
metadata:
name: my-app
spec:
source:
repoURL: https://github.com/my-org/my-app
path: k8s/Choose Flux if: You prefer declarative configuration and don’t need a UI Choose Argo CD if: You want a rich web UI and visual application management
9. Istio - When Microservices Get Complex
Istio provides:
- Traffic Management: Load balancing, routing, retries
- Security: mTLS, authentication, authorization
- Observability: Metrics, logs, traces
Only use Istio when you have:
- Multiple microservices that need to communicate
- Complex routing requirements
- Strict security requirements
- Need for advanced observability
Reality check: Istio adds significant complexity. Start simple and add it when you actually need service mesh capabilities.
10. Timoni - The Helm Alternative
Timoni uses CUE (Configure Unify Execute) language for type-safe package management. Instead of Go templates like Helm, Timoni leverages CUE’s data validation and schema capabilities.
Getting started with Timoni:
# Install Timoni
brew install stefanprodan/tap/timoni

# Deploy an app from a registry
timoni apply my-app oci://ghcr.io/stefanprodan/modules/nginx

# Deploy with custom values
timoni apply my-app oci://ghcr.io/stefanprodan/modules/nginx \
  --values ./my-values.cue

# List deployed instances
timoni list

# Generate Kubernetes manifests without applying
timoni build my-app oci://ghcr.io/stefanprodan/modules/nginx
# Install Timoni
brew install stefanprodan/tap/timoni
# Deploy an app from a registry
timoni apply my-app oci://ghcr.io/stefanprodan/modules/nginx
# Deploy with custom values
timoni apply my-app oci://ghcr.io/stefanprodan/modules/nginx \
--values ./my-values.cue
# List deployed instances
timoni list
# Generate Kubernetes manifests without applying
timoni build my-app oci://ghcr.io/stefanprodan/modules/nginxKey advantages over Helm:
- Type Safety: CUE language provides compile-time validation
- Schema Validation: Catch configuration errors before deployment
- Better Composition: CUE’s unification model allows powerful data merging
- No Template Hell: Avoid complex Go template logic
Why consider Timoni:
- Type safety (catch errors before deployment)
- Better validation than Helm templates
- More expressive than Kustomize
- Growing ecosystem
- Native OCI registry support
Tool Combinations That Work
For Small Teams (1-3 developers)
- kubectl + K9s + Helm + Skaffold
- Skip the service mesh, keep it simple
For Growing Teams (4-10 developers)
- Add Lens for junior developers
- Kustomize for environment management
- Flux or Argo CD for production deployments
For Enterprise (10+ developers)
- Full stack: All tools as needed
- Istio for complex microservices
- Timoni for type-safe configurations
The Learning Path
Week 1-2: Master the basics
- kubectl fundamentals
- K9s for daily operations
Week 3-4: Add package management 3. Helm for installing applications 4. Basic Helm chart creation
Month 2: Development workflow 5. Skaffold for development 6. Kustomize for configuration
Month 3+: Production concerns 7. GitOps with Flux or Argo CD 8. Lens for team collaboration 9. Istio only if you need service mesh 10. Timoni as Helm alternative
Common Tool Mistakes
1. Starting with Istio Too Early
Mistake: Adding service mesh before you have actual microservices Reality: You probably don’t need Istio until you have 5+ services with complex communication patterns
2. Helm vs Kustomize Religious Wars
Mistake: Thinking you must choose one Reality: Use Helm for third-party applications, Kustomize for your own configurations
3. Tool Sprawl
Mistake: Installing every tool because it’s “best practice” Reality: Each tool adds cognitive overhead. Start minimal and add tools when you feel the pain they solve
4. Ignoring the Learning Curve
Mistake: Expecting instant productivity Reality: Budget 2-4 weeks to become proficient with the core tools
Tools to Watch (Emerging)
- Crossplane: Infrastructure as Code with K8s APIs
- Pulumi: Modern Infrastructure as Code
- Telepresence: Local development against remote clusters
- Linkerd: Simpler service mesh alternative to Istio
The Reality Check
After 8 years with Kubernetes, here’s what I’ve learned about tools:
The 80/20 Rule: 80% of your work will use kubectl, K9s, and Helm. The other 20% requires specialized tools.
Tool Fatigue is Real: Every tool you add increases cognitive load. Be selective.
Start Simple: You can run production Kubernetes with just kubectl and Helm. Add complexity only when you feel the pain it solves.
Team Context Matters: What works for Netflix won’t work for a 3-person startup. Choose tools that match your team size and complexity.
Quick Reference Commands
kubectl Essentials
# Get everything in a namespace
kubectl get all -n my-namespace

# Watch pods in real-time
kubectl get pods -w

# Port forward for local testing
kubectl port-forward svc/my-service 8080:80

# Get cluster info
kubectl cluster-info

# Switch contexts
kubectl config use-context my-cluster
# Get everything in a namespace
kubectl get all -n my-namespace
# Watch pods in real-time
kubectl get pods -w
# Port forward for local testing
kubectl port-forward svc/my-service 8080:80
# Get cluster info
kubectl cluster-info
# Switch contexts
kubectl config use-context my-clusterK9s Key Bindings
:pods     # View pods
:svc      # View services
:deploy   # View deployments
:ns       # View namespaces
l         # View logs
d         # Describe resource
e         # Edit resource
:pods # View pods
:svc # View services
:deploy # View deployments
:ns # View namespaces
l # View logs
d # Describe resource
e # Edit resourceHelm Quick Commands
# Search for charts
helm search repo nginx

# Show chart values
helm show values bitnami/nginx

# List installed releases
helm list

# Rollback release
helm rollback my-release 1
# Search for charts
helm search repo nginx
# Show chart values
helm show values bitnami/nginx
# List installed releases
helm list
# Rollback release
helm rollback my-release 1Final Thoughts
The Kubernetes ecosystem has an overwhelming number of tools, but you don’t need to learn them all at once. Start with the daily drivers (kubectl, K9s, Helm), add tools as you feel their absence, and remember that the best tool is the one your team actually uses consistently.
The goal isn’t to use every tool - it’s to be productive with Kubernetes. Sometimes that means kubectl and vim. Sometimes it means a full GitOps pipeline with service mesh. Choose tools that solve real problems you’re experiencing, not problems you think you might have.
Most importantly: Master the fundamentals before adding complexity. A team that’s great with kubectl, K9s, and Helm will outperform a team that’s mediocre with 15 different tools.
Want to discuss tool choices or share your Kubernetes tool stack? Feel free to connect with me through the contact information on this site.